Extracting Power BI Tenant Settings with Power Automate Desktop
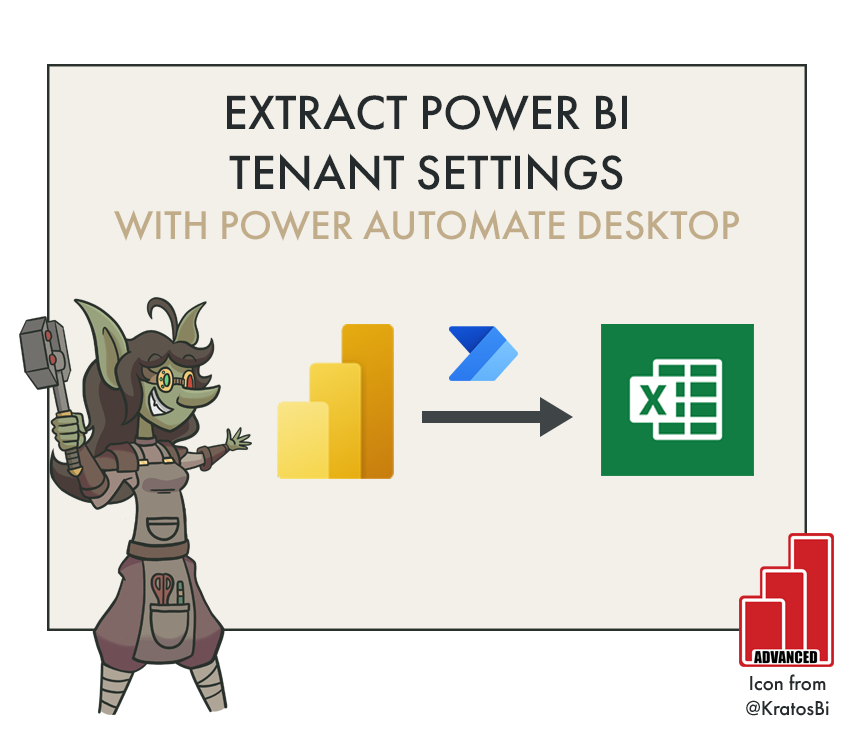
AUTOMATICALLY EXTRACT POWER BI TENANT SETTINGS
…using a Power Automate UI flow to crawl the tenant setting page
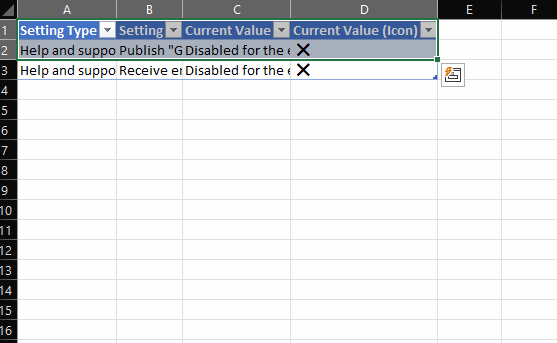
The UI Automation flow running and collecting the tenant settings
IN THIS ARTICLE
UI / Browser Automation flows with Power Automate Desktop
Web scraping with Power Automate Desktop
Finding & testing CSS Selectors to get data from web pages
Using & testing regular expressions (regex)
List of Power BI Admin tenant settings - default and recommended.
To use the solution file:
Install Power Automate Desktop and configure the browser extension for your preferred browser
Upload the .zip to “solutions”
Click the ellipses on the solution and go “edit”, opening the flow in Power Automate Desktop (PAD)
In PAD, adjust the first step to link to your tenant settings (ctid) if necessary
Please note that this solution is provided with no warranty or guarantees of any kind.
It was something I made to test UI Flows in PAD and shouldn’t be seen as an out-of-the-box solution.
EXTRACT TENANT SETTINGS WITH RPA
I lately had a case where I needed to compare settings across two different tenants. Since there are 85 different settings in the admin portal - not including the Premium or Premium-Per-User settings - this isn’t something I was keen on doing, manually. I didn’t immediately see a way to do this with the PowerShell cmdlets, so I decided to recycle an existing web-scraping flow to get it done in Power Automate Desktop (PAD).
INTRO TO POWER AUTOMATE DESKTOP
PAD is a handy low-code / no-code RPA tool. The functionality available is impressive and has grown tremendously in the last years since it was released. The UI of PAD is also very elegant; it is very easy to learn and use. You can automate pretty much anything, from web-scraping to UI & browser automation or even more complex tasks. To schedule or automatically trigger a PAD flow, however, you need a Premium license; this is because it requires creating a scheduled Power Automate flow in the cloud (via the browser) which connects to PAD on your machine either through an Enterprise Data Gateway cluster, or directly to the machine, depending on your set-up.
In the below article, I’ll explain how to set up a similar flow step-by-step. This isn’t meant to be a tool or the most efficient way to do this, I just enjoy working with PAD & setting up flows that I re-use, often.
A high-level overview of how the flow is set-up; browser automation + UI automation with Excel.
RECOMMENDED TENANT SETTINGS
I extended the final output with some additional data, then some manual formatting and notes for readability
I’ve already included the final adjusted output, which has mock tenant settings together with generic recommendations, including links if recommendations are provided by Microsoft. Since those recommendations are out-of-date (many of the settings in that article are not in the portal, anymore), I included some notes in the output file.
ASSUMPTIONS
You have installed Power Automate Desktop
You have administrator privileges on your Power BI Tenant
You have either Chrome or Firefox with the Power Automate extension installed
TUTORIAL
STEP 1: LAUNCH THE BROWSER & EXCEL
First, add the two steps which will launch the applications we’ll use for collecting the data.
Launch New [Browser] (i.e. Firefox, Chrome or Edge) and navigate to https://app.powerbi.com/admin-portal/tenantSettings
Launch Excel

STEP 2: CREATE A SUBFLOW FOR INITIALIZING VARIABLES
There are 3 variables that you need:
sectionnumber - This is the CSS selector for the nth-child of the header element you will extract
settingnumber - This is the CSS selector for the nth-child of the setting element you will extract
Excelrownumber - This is the row number used for data entry in Excel. It’s initial value is equal to the settingnumber; we’ll see later why it needs to be a separate variable.

STEP 3: ADD A WAIT STEP OF 3-5 SECONDS
When you are opening new windows, its a good practice to include a wait step so that you are sure that everything loads. In the actions, there are often advanced options that let you select ‘wait until loaded’ or similar, but this isn’t fool-proof, particularly for web-scraping.

STEP 4: INITIALIZE THE EXCEL BY ADDING HEADERS
These are just 4 steps to add the header text. It’s good to have them early-on so you are familiar with how the data entry automation works in Excel. We will have 4 headers:
Setting Type: The category of the setting
Setting: The name of the setting
Current Value: The setting value (i.e. Enabled for the entire organization)
Current Value (Icon): An emoji which will more easily show what the Current Value is.
You can add more columns if you want more data, but it takes a while to execute in a UI automation flow. If you want much more information, you should consider a headless data collection, programmatically, instead.

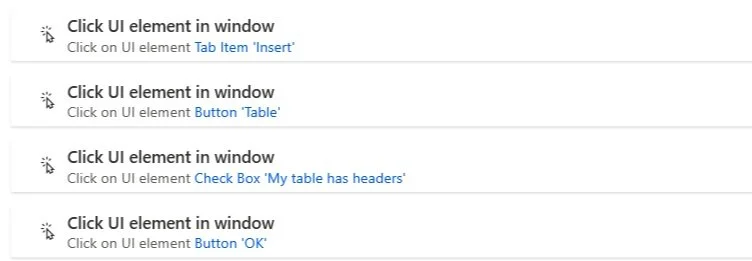
OPTIONAL STEP: UI AUTOMATION FOR FORMATTING
This is completely optional. You can set up some additional UI automation for formatting, like inserting a table and naming it, or even conditional formatting. To do this, you have to add UI Elements using a selector, or by specifying them with a custom entry. It’s very easy to do from the UI Elements pane. Just select ‘Add New’ and CTRL + Click on the element you want to add. Afterwards, it’s a good practice to re-name your elements and examine the automatically generated text that defined them, so you can learn to do this yourself; it’s pretty easy.
I set up some UI automation to add a table.
STEP 5: SCRAPING THE LAST SETTING FROM THE ADMIN PORTAL
- ADDING THE UI ELEMENTS & CUSTOMIZING THE CSS-SELECTORS
The first thing we need is the last thing we will need. This is because we are going to loop through each setting to get the data, until the setting we get is equal to the last setting, upon which time we will terminate the loop. So we need the last setting to know when to stop. It’s good to grab this as an early part of the flow, so it’s fully automated.
To get this, we have to know its CSS Element. This describes in generic terms where the object is on the webpage in its CSS code. To find CSS Elements, I prefer to use Firefox. You just have to right-click the page, and go Inspect (CTRL + O).
Inspecting the Admin Portal in Firefox to find the CSS Selectors. Notice the ‘winautomationvisibilitylandmark=”true” — this is from the Power Automate extension.
Test the CSS Selector with the console entering $$(‘<selector here>’)
Inspect the page with the admin settings
Hover on the text at the bottom of the page, until you reach the upper-most element that highlights all of the first setting.
Right-click this element (it should be a div), and go Copy > CSS-Selector…
Paste the CSS-Selector in Notepad++ to examine it
Go back to Firefox and select the ‘Console’
Type the CSS-Selector you just entered and press enter
Hover on the resulting “target symbol” that appears — this is how you test your CSS selectors
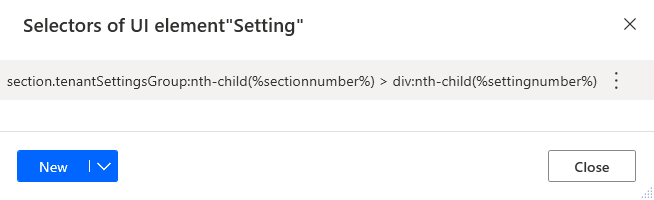
Once we have the CSS Selector, we need to play with it a bit to understand where we can insert our variables. for section.tenantSettingsGroup:nth-child(1) > div:nth-child(2) - if we replace the (2) with (%settingnumber%), this will let us iterate through the children of the tenantSettingsGroup; each of the settings. This is what we want to do. But what about the first nth-child? This is the settings group; the section. We have to take this into account in our loop, so we have to replace (1) with (%sectionnumber%), so we can loop through the children of each section before moving to the next section.
The final dynamic CSS Selector is thus section.tenantSettingsGroup:nth-child(%sectionnumber%) > div:nth-child(%settingnumber%).
To get the last child we can modify this UI element to section.tenantSettingsGroup:last-child > div:last-child, which will give us the last setting. We can test this in the console to confirm.

We next should repeat this CSS selector exercise to find the header of each section. Finally, we are left with our 3, custom UI elements, which we have also re-named.
We can now add as step Get details of element on web page for the ‘Last Setting’ UI Element, scraping the ‘Own Text’ attribute.
The step that will let us scrape the last setting, for use in exiting the loop.
STEP 6: CREATING THE LOOP
Add a while loop - while %SelectedSetting% <> %LastSetting%…
We start the loop by scraping both the Setting and the Setting Type, using the same method described, above. If you check the variable that is produced when getting the Setting, you’ll notice that we have both the setting name and its value. To separate them, we have to do a split by line feed, with everybody’s favourite, regex.

STEP 7: CLEANING THE TEXT WITH SPLIT & TRIM
The variable %Setting% will now contain the text for both the setting and its value. To separate them, we have to split by the new line; the line feed. To do this, we can split with regular expressions (regex), which is a complex syntax to flexibly identify character patterns in strings. Regex is very hard to learn and memorize. I always use https://regex101.com when writing and testing (or debugging) regular expressions. This tool is extremely handy and makes your life infinitely easier when working with regex.
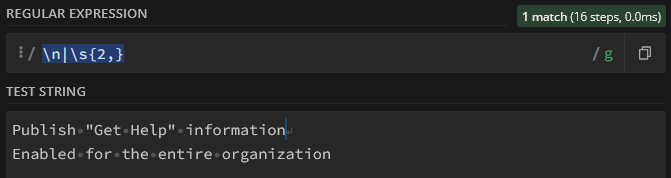
https://regex101.com is handy as hell.
The regex identifier for a new line / line feed is \n, but to be sure you identify it, you should also include \s{2,}/g (two spaces wrapped across lines; globally). Putting them together and you have a split step by \n|\s{2,}/g. Split will create a two-item array from the text; the first item is the setting, and the second is the value.
You can then set the string variables for setting type, and both the setting and value. To extract an item from a list, you just need to refer to the index. Here, you would use %TextList[0]% (inside the percentage symbols) in PAD. This will grab the first item (lists start at 0). Likewise, %TextList[1]% will grab the second.
Finally, add a trim step to remove any whitespace characters from the beginning and end of the string(s); mainly for the Setting variable.

STEP 8: WRITE TO THE WORKSHEET
Now you have the text, you just have to enter it in the appropriate cells of the Excel window. You do this by repeating the steps above for the headers, just using different variables.
OPTIONAL: ADDING ICONS FOR EASIER READING
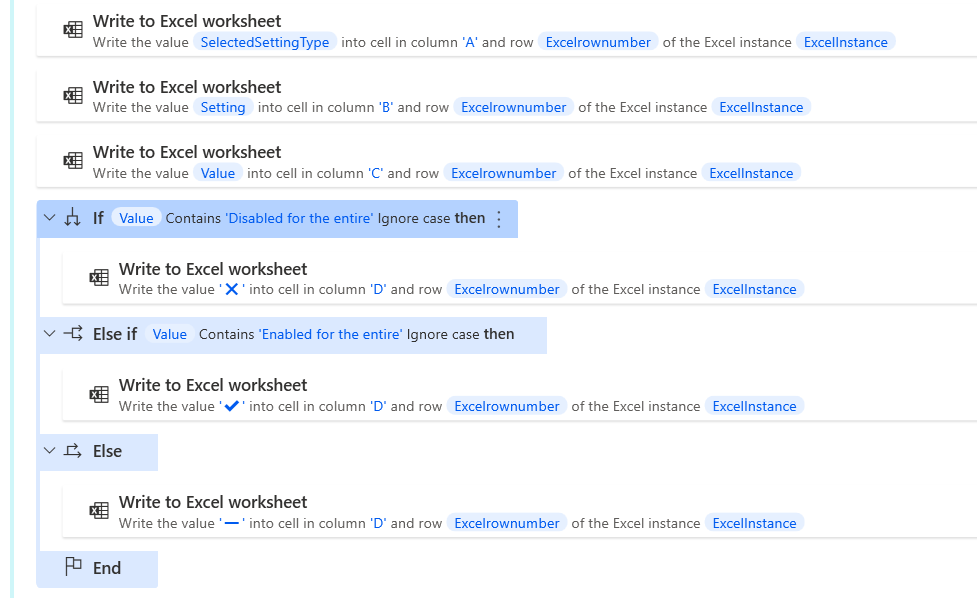
You can also add an extra IF/ELSE statement to populate the fourth column with emoji’s for whether the setting is enabled (✔), disabled (❌) or limited to a security group (➖). These are easy to figure out; so I will just include the screenshot, below.
STEP 9: INCREMENTING THE VARIABLES

You need to add a final step to this main flow to increase the variables for Excelrownumber and settingnumber by 1, and then the loop ends. You can also add a ‘Close web browser’ step after the loop is terminated, but this is also optional (and cleaner).
But what about the section? How do we handle that?
With errors, you see…
STEP 10: USING ERROR HANDLING TO LOOP THROUGH SECTIONS IN A SUBFLOW
We need to make a modification to two steps - the steps where we scrape the Setting and Setting Type. You see, if we run the flow now, it will work perfectly fine for the first section, but then terminate with errors. That is because it will try to increment past the last child of the div element, which doesn’t exist; it won’t find it.
Instead, we need to increment the section when this happens (i.e. when the setting step returns an error) and try again from the 2nd child, then repeat the process. To do this we have to make two modifications:
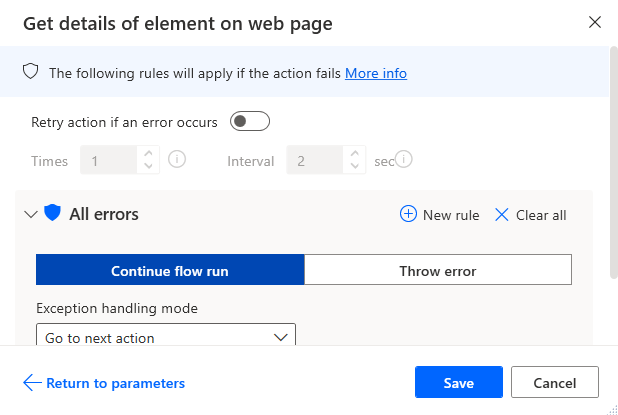
To the ‘Setting Type’ step (get details of element on web page) we need to change “On Error” to “Continue flow run”.
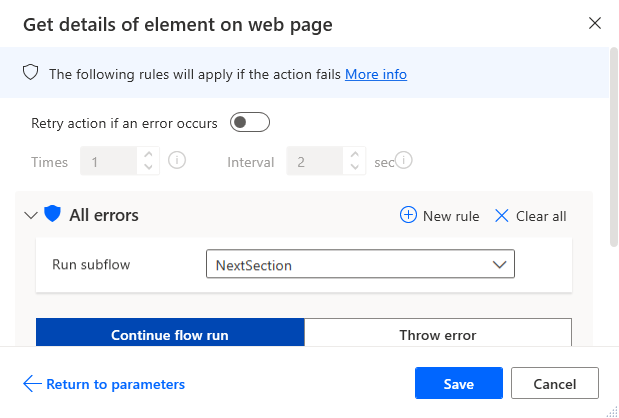
To the ‘Setting’ step, we have to do the same as above, but also add a step to have it trigger a subflow on error. This subflow will increase the sectionnumber variable, reset the settingnumber variable, and try again to extract the setting. We should put error handling in this extraction step, too.
Thus, when the first setting extraction fails to find a setting (because we’ve gone through the whole list), it will trigger the subflow to increment the section, and we repeat, looping through all the settings in that section. This goes on until we reach the last setting, after which the loop stops.

The subflow to increase the sectionnumber when a setting cannot be found (because the nth-child is out of range).
That’s it! Now, if you run the flow, it should easily grab all the settings in about 3-4 minutes, while you either watch or re-fill your coffee. Of course, this isn’t the fastest way, but once you’ve set it up, it’s pretty damn easy.
The final result after some formatting and notes; link at the top of the article to download this sheet.
TO CONCLUDE
UI Automation / RPA flows using Power Automate Desktop are really great. They can help you automate monotonous tasks or avoid data entry. It’s definitely something worth looking into, if you haven’t yet!