Recover Power BI reports or models that you can’t download
DOWNLOAD A REPORT OR MODEL FROM FABRIC
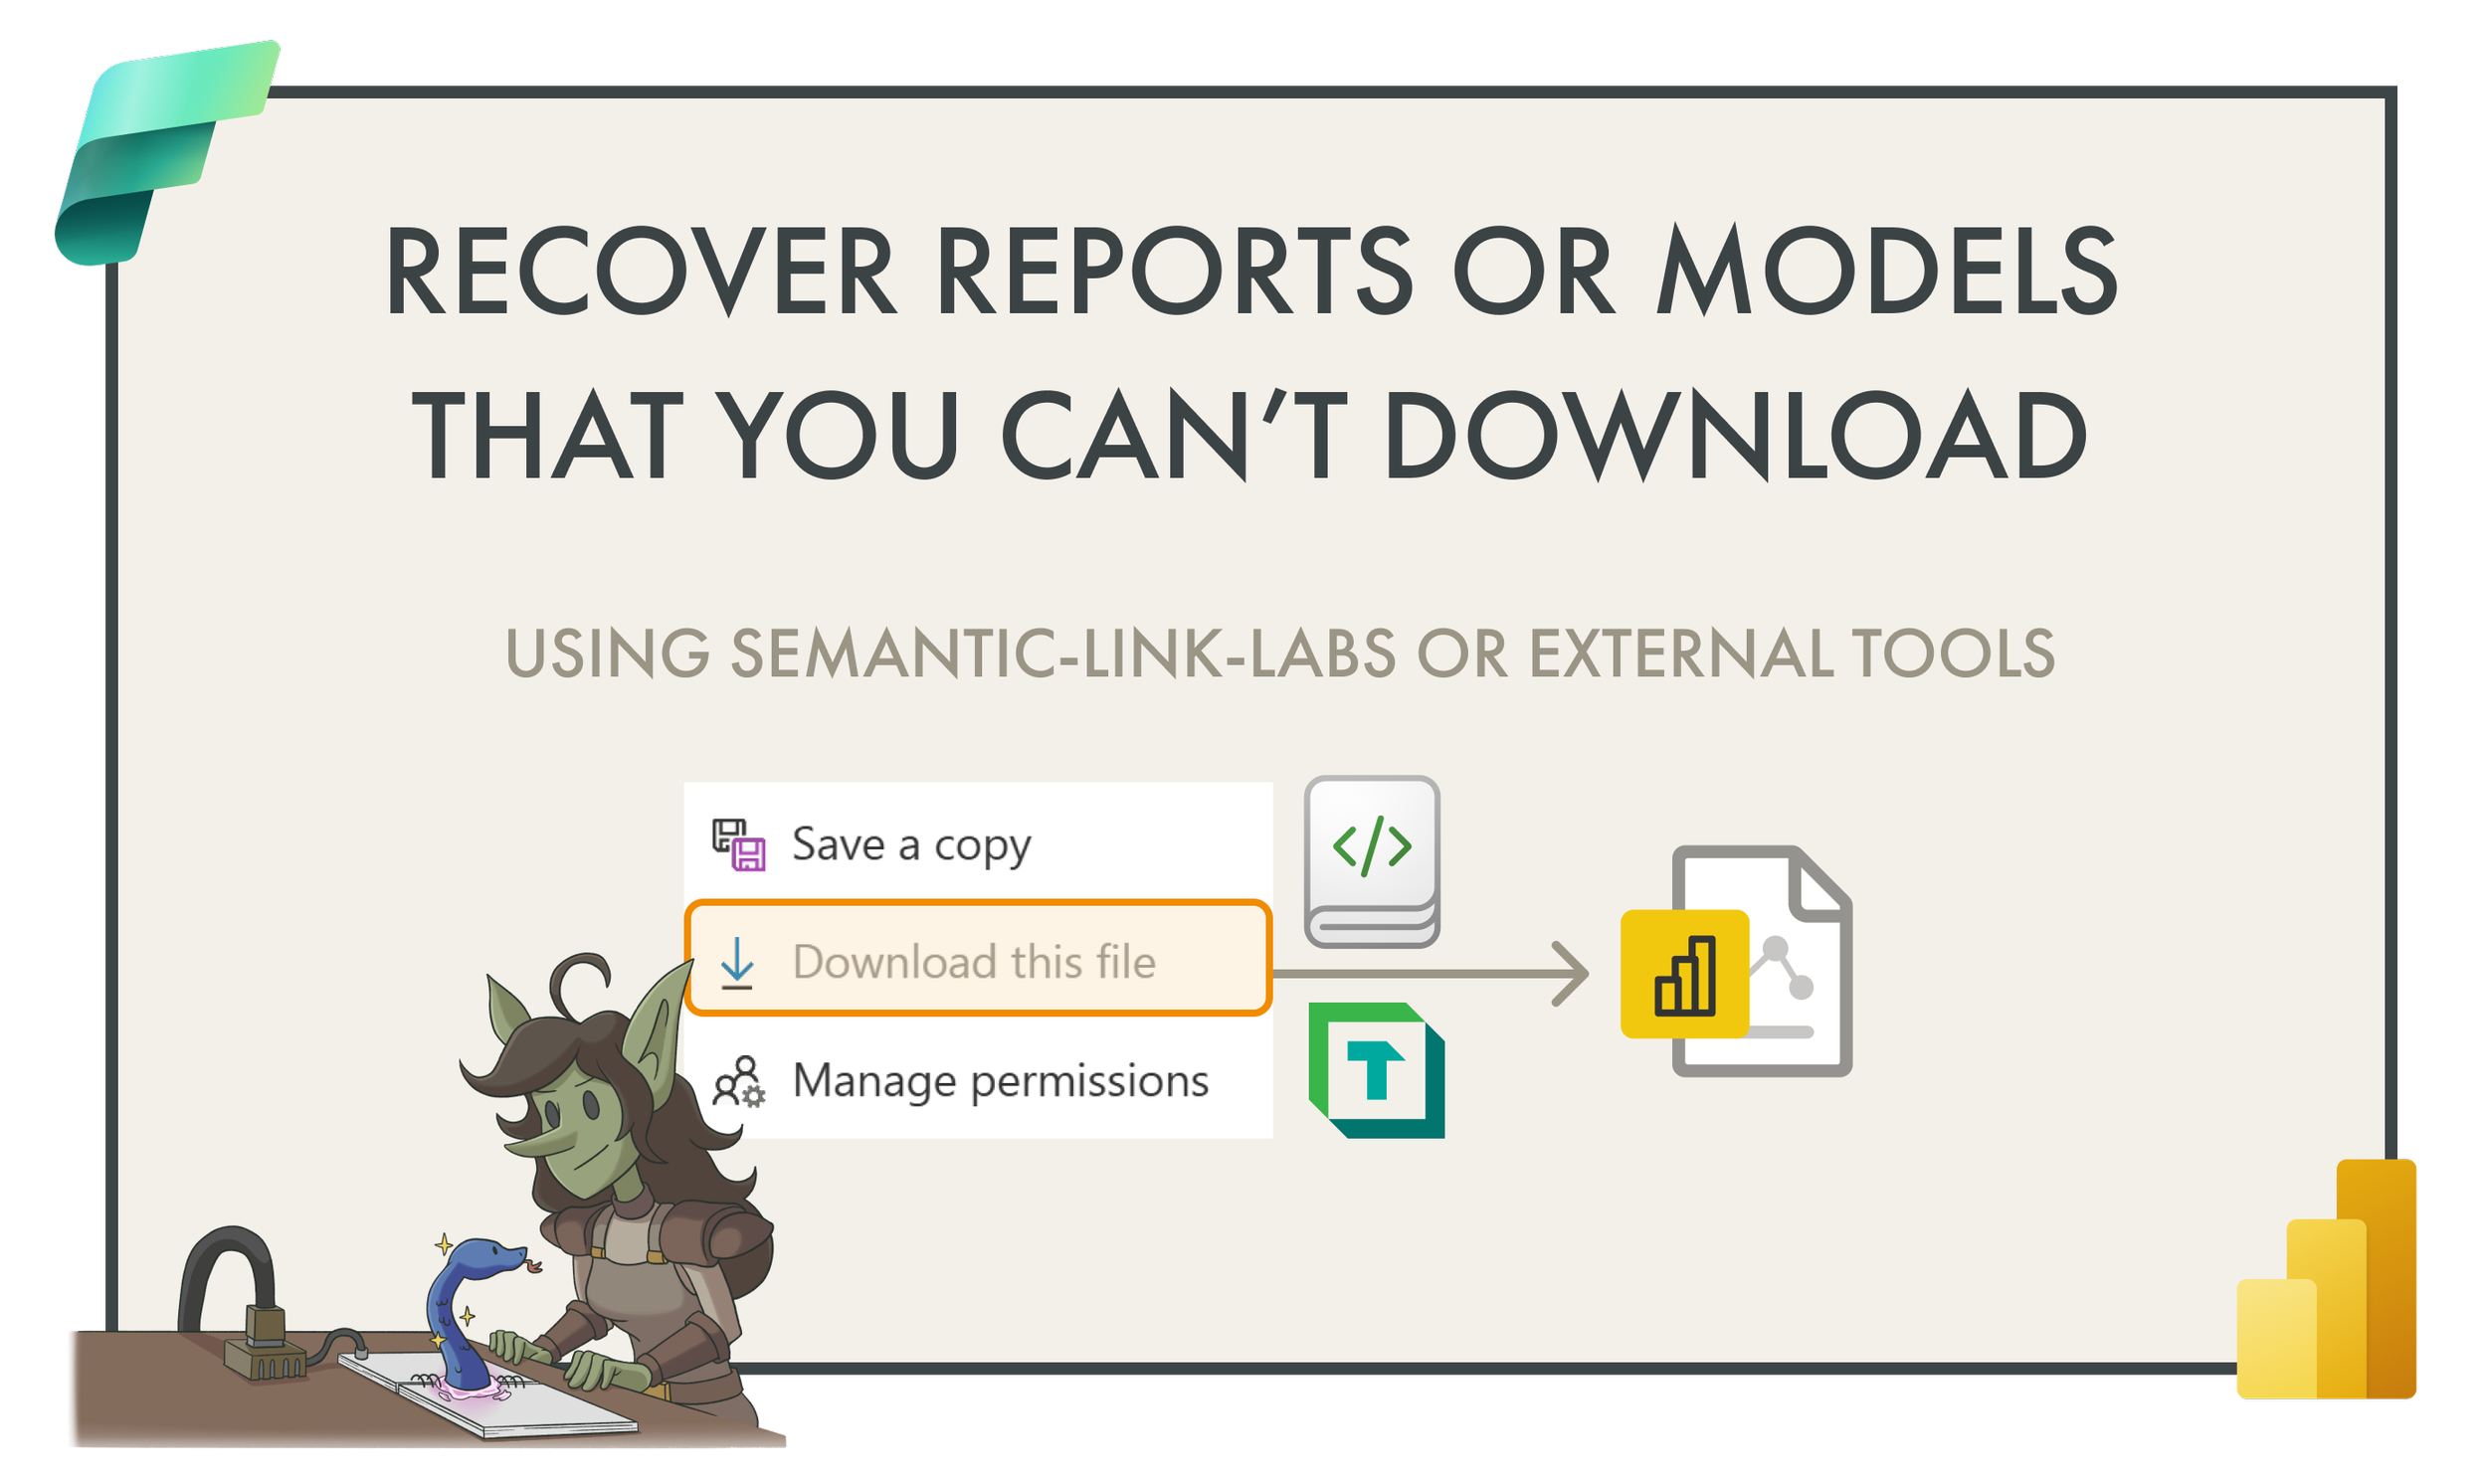
…if the Power BI “download this file” is greyed out and you’re unable to download it from the user interface.
TL;DR: Use semantic-link-labs in a Fabric notebook to copy the report metadata to a lakehouse, download and copy that metadata into an empty PBIP file, and then continue in Power BI Desktop.

In the Power BI service or Microsoft Fabric, you might encounter situations where you can’t download a report or model from a workspace. Depending on your workflow, this could be problematic; for instance, you might need to work further on this file in Power BI Desktop. To do that, you first need to recover a Power BI Desktop (PBIX) file or the newer format, Power BI Projects (PBIP).
Below are some reasons why you might not be able to download your Power BI report or model from a workspace:
The report was created in the service:
Someone created the report manually (using the User Interface) and connects to a model in another workspace.
Someone created the report programmatically (for instance, using the REST APIs).
Power BI created the report automatically (for instance, it copied the report to a workspace that belongs to a later stage in a deployment pipeline)
You used the REST APIs to re-bind a report (changed which model it connects to as a data source).
The model has incremental refresh enabled.
The model uses automatic aggregations.
The model was modified via an XMLA endpoint.
Other scenarios described in the limitations in the Microsoft documentation.
When you encounter this scenario, you see something like the following image, which shows the Download this file option greyed out from the File menu of the Power BI report.

In this article, I’ll explain how you can recover your published reports and models as PBIX or PBIP files if you have access to a Fabric workspace. The reports and models themselves don’t have to be in a Fabric workspace for this approach to work. In short, we’re going to use a bit of Python code in Fabric notebooks together with the semantic link library and its “expansion pack” called semantic-link-labs.
The approaches I’m talking about here use semantic-link-labs, which itself uses the Fabric REST APIs. There’s other approaches that I detail briefly at the end of the article which are similar but leverage slightly different tools in different ways; ensure that you read until the end to see if those are the best match for your scenario, too.
 The purpose of this article is twofold:
1. To explain how to get PBIX or PBIP files from a workspace when you can't download them with the UI.
2. To demonstrate a use-case for semantic link labs in Fabric notebooks with Power BI reports.
This article is informative; I'm not trying to sell you Fabric, nor endorsing a tool, feature, or approach.
This article is one of three examples of things I like to do in semantic-link-labs with reports.
PART 1: RECOVER A REPORT

This section of the article will explain how to retrieve a “thin report” from the workspace which you can open in Power BI Desktop and connect to a published semantic model. If you expect to have a “thick report” PBIX file which contains both the model and report, I would discourage this. The reason is because it is considered a best practice to separate report and model development into distinct PBIX files (or other formats). The reason for this is because the models and reports become easier to manage, and you are less likely to accidentally change one when modifying another. If, however, you insist on getting a PBIX file that contains both the model and report, I will explain how to do this in Part 3.
SCENARIO DIAGRAM: RETRIEVING THE REPORT FROM THE SERVICE
The following diagram depicts this approach and the involved components:

STEP 1: SETUP WORKSPACE AND CREATE ITEMS
In this step, you need to ensure that you have a Fabric workspace with a notebook that has access to a lakehouse and the semantic-link-labs library. In general, it might be a good idea to set up a separate workspace to use with notebooks to automate and centralize item management with code, like this task.
If you don’t yet have access to workspace on a Fabric capacity, follow the below steps:
Start a Fabric trial or purchase a Fabric pay-as-you-go capacity, if you don’t have one, already. This can be the smallest capacity size (F2 SKU), since you’re only using it to get some metadata files.
Create a workspace and set its license mode to the Fabric capacity.
Once you have a workspace with Fabric capacity, continue as follows:
Create a lakehouse. You don’t need a lakehouse schema, so ensure that option is unchecked.
Create a notebook or import the notebook you downloaded from this article. To import a notebook, you have to first change “views” to one of the non-Power BI views, like “Data Engineering” or “Data Science”. You can do this from the bottom-left corner.
Create an environment. You will use this environment to install custom libraries like semantic-link-labs, so that you don’t have to install them in each individual notebook. However, can choose to neglect this step and install semantic-link-labs in the notebook by running %pip install semantic-link-labs.

STEP 2: INSTALL SEMANTIC-LINK-LABS
Open the custom environment that you created and install the semantic link labs library. Select “Add from PyPi” and enter “semantic-link-labs”, then save and publish all changes for this environment. You need to wait a while for the environment to publish so that you can use it.
As mentioned in the previous step, you can choose to neglect step 2 and instead install semantic-link-labs in the notebook during step 3, by running %pip install semantic-link-labs.
STEP 3: SETUP AND RUN THE NOTEBOOK TO GET THE REPORT DEFINITION
Open the notebook that you created and attach a lakehouse by following the instructions on the Lakehouses blade on the left-hand side of the notebook user interface. The following diagram shows you the different UI elements you use to attach the lakehouse

Once you attach the lakehouse, you next want to select your custom environment that you set up and published. Note that you can only do this once the changes are finished publishing; again, this takes quite some time. Below is what it looks like when you can select a custom environment to use in your notebook:

Next, in a new code cell, add and adjust the following code, replacing “ProReport” with the report name that you want to copy, and “ProWorkspace” with its workspace name.

When you run this code (after starting your spark session), it will retrieve the report definition from the target report in the target workspace. The output of the code is a variable called definition which is a dataframe that contains the base64 payload of each “part” of the report definition. These are metadata files which describe how the report looks and which semantic model it should connect to. In the next step, we’re going to write these files to the lakehouse so we can retrieve and use them.
Note that only the workspace with the notebook, lakehouse, and environment needs to be in a Fabric capacity. The target workspace where you published the report doesn’t need to be on Fabric capacity or even be Premium (P SKU) or Premium-Per-User (PPU).
In the example above, the report is published to a workspace that uses the “Pro” license mode, which you can also see, below:

Continuing on, we only need one more notebook cell. This cell contains code that is going to loop through the previous dataframe, and for each row, create a new file in the lakehouse with that file:

Each file is written to a custom directory with the name of the report. We now have the definition files and we can use them to “restore” our report that we couldn’t download; it’s all downhill from here.
STEP 4: GET THE DEFINITION FILES FROM YOUR COMPUTER
To retrieve the definition files, we will use OneLake Explorer. OneLake explorer provides a OneDrive-like interface to access Fabric data locally if you have a Windows machine.
If you haven’t yet, download and install OneLake Explorer, and complete its setup. Once you do this, you should see a folder structure which resembles the workspaces that you have access to, for any workspaces that have data in OneLake. Inside of this folder structure, you can find the report metadata files that we just created, virtualized and available from our desktop.
You can navigate through these folders to find this metadata in the finder on your computer, now:

STEP 5: CREATE AND SAVE AN EMPTY PBIP FILE
Next, you should open Power BI Desktop and create a new Blank report. This empty file is where we are going to add the report metadata files. First, we need to save this report as a PBIP file, so that it understands the report metadata file formats. If you haven’t yet, you should enable the new PBIP format.
DO NOT enable the new PBIR enhanced report metadata format while its in preview, because (while in preview) the files we retrieved have a different format. This preview PBIR format also comes with many limitations. You should only enable this format if the published report is also using it.
The following diagram shows you where to find the preview settings for the PBIP format:

STEP 6: OVERWRITE THE EMPTY PBIP FILE’S METADATA TO FINISH
Finally, you want to copy the metadata files from OneLake explorer to the empty PBIP file. Specifically, you want to copy these files to the “.Report” folder, which contains the same information.

Once you do this, you can open the recovered report in Power BI Desktop by double-clicking the .pbip file. From here, you can continue working in Power BI Desktop, or save the report as a PBIX file, if you wish.

You’ve now recovered the report that you could not download from the service. Some suggested clean-up from here includes:
Removing the report metadata files from the Lakehouse
Testing the recovered report in Power BI Desktop
Testing the recovered report after publishing it to a workspace.
Marking the original, target report for archival and deletion, once you’ve tested the recovered report.
Pausing the Fabric pay-as-you-go capacity, if you will only use it for this (so it doesn’t cost you money).
This approach can save you a lot of time. You can automate it further, by creating all of the other “supporting” files for the PBIP as you write to the lakehouse, which means that you can skip the last two steps. I’m sharing the full set of steps rather than the abridged, more efficient version, so that the approach is clear.
 Don't forget to pause your capacity if it's not in use:
Don't forget to pause your Fabric capacity if it's pay-as-you-go and not in use. Otherwise you pay for each minute that it's running, which can cost you a lot of money.
PART 2: RECOVER A MODEL
The previous sections only explained how to recover a report. If you need a data model, then you need a different approach, because you need to retrieve your model metadata. Thankfully, this is still possible.
You don't need Power BI Desktop to manage a data model:
Even if your model remains in the service, this is also fine. It's valid if you or your users prefer to use Power BI Desktop, but you can also manage a published data model in several ways:
1. Edit data models in the Power BI service, in the web browser.
2. (Fabric, Premium, PPU only) Manage data models via XMLA endpoints. You can do this easily by making use of external tools like Tabular Editor or ALM Toolkit.
3. (Advanced) Deploy model changes (made to a PBIX file) to a workspace via REST APIs.
APPROACH 1: USING TABULAR EDITOR (FABRIC, PREMIUM, OR PPU)
In the first approach, the model is on a Fabric, Premium, or PPU license mode workspace, and you recover the metadata using Tabular Editor, overwriting the model.bim file in an empty PBIP file. The scenario diagram for this approach is below:

I’m currently sick, so I’m abridging this article and summarizing the steps below. You can find a full write-up of the approach in the Tabular Editor docs, here.
Step 1: If the model is in a workspace that’s on Fabric capacity, Premium capacity, or uses the Premium Per User license mode, then you can connect to it using XMLA endpoints. This lets you connect to a model with external tools to get access to advanced features or productivity enhancements. Click here to find out where to get the connection string for your workspace.
Step 2: Connect to the model from Tabular Editor. If your model has incremental refresh enabled or uses automatic aggregations, you need to disable that stuff.
Step 3: Once connected, you can then prepare to save your model metadata.
Step 4: Create an empty PBIP file where you’ll overwrite the model metadata. This is the same as described in the previous section.
Step 5: The model metadata in a PBIP file is located in the .Dataset folder. You can overwrite this model.bim file from Tabular Editor.
If you’ve enabled the option to “Store semantic model metadata using TMDL format” then this metadata is in the TMDL format, and you’ll need to ensure that the serialization settings of Tabular Editor align with the serialization done by Power BI Desktop. Serialization just means how the tool breaks apart the metadata into individual files, something which is handy for source control. If you don’t know what any of that means, don’t worry about it; just use the .bim format and ensure that you’ve saved the empty PBIP with the TMDL option disabled.Step 6: You need to open the PBIP file where you’ve just overwritten the model.bim. The first thing that you should do is go into the “Power Query” UI (“Edit Data” or “Transform Data”), and check each query. Generally, it’s best if you let each query preview load. Then, click “Close & Load data”. If it’s an import model, you’ll now load the data to the model. You can save the file as a PBIP or as a PBIX and continue.
This approach works fine; I’ve done it dozens—likely hundreds—of times. However, it’s not officially supported, so make sure that you validate the model before continuing. Notably, this approach only works if you have XMLA endpoints enabled and the model is published to a Fabric, Premium, or PPU workspace. If the model is on a Pro workspace or you prefer an approach similar to the previous section, you can use semantic-link-labs.
APPROACH 2: USING NOTEBOOKS AND SEMANTIC-LINK-LABS
To recover a model, you can also take an approach identical to what we did with the report metadata, earlier. This approach differs only slightly in that the code is a bit simpler. Notably, if the model has incremental refresh, then you will need to disable it first, which might be complex.
The scenario diagram for this approach is below:

The steps for this approach are below:
Step 1: Create a Fabric workspace and add a notebook, lakehouse, and environment item. You can also re-use the ones that you used from recovering a report (or something else). The Fabric capacity can be a trial or smaller F2 SKU.
Step 2: Ensure that you install semantic-link-labs before proceeding. This is best done in a custom environment.
Step 3: In the notebook, retrieve the bim definition from the target model in the target workspace. The target workspace can be a Pro workspace. The code for this looks something like the below:

Step 4: Retrieve the .bim file using OneLake Explorer.
Step 5: Create and save a new, empty PBIP file. Ensure that the “TMDL” option is disabled.
Step 6: The model metadata in a PBIP file is located in the .Dataset folder. Copy and paste the model.bim file from OneLake explorer to the PBIP, overwriting the original model.bim.
Step 7: Same as with the other approach, you need to open the PBIP file where you’ve just overwritten the model.bim. The first thing that you should do is go into the “Power Query” UI (“Edit Data” or “Transform Data”), and check each query. Generally, it’s best if you let each query preview load. Then, click “Close & Load data”. If it’s an import model, you’ll now load the data to the model. You can save the file as a PBIP or as a PBIX and continue.
After Step 7, you should also perform cleanup by removing the model.bim from the lakehouse and pausing your capacity, if it’s not needed.
This approach is fairly straightforward if you have access to a Fabric notebook and lakehouse. Note that you might also try retrieving the model.bim using the REST APIs and taking a similar approach, but I didn’t test that, because those APIs drive me nuts.
Like Approach 1, this is also not officially supported, but it’s a good workaround.
APPROACH 3: USING GIT INTEGRATION
If the model is published to a Fabric, Premium, or PPU workspace, you can also use Git integration. This approach is described by Marc Leijveld on his blog. I also think that this approach should work with reports, to be honest. It too is not officially supported, but it’s good to have multiple options available.
APPROACH 4: USING VS CODE AND THE FABRIC STUDIO EXTENSION
Mathias Thierbach let me know that this approach (copying/replacing PBIP/PBIR metadata) also works if you use the Fabric Studio VS Code extension created by Gerhard Brueckl. This extension is available for free and uses the Fabric REST APIs. I haven’t tried this approach out myself, but if you use VS Code and this extension, it’s could be the best option for you.
APPROACH 5: USING POWERSHELL
James Bartlett also has an approach to do this via PowerShell that leverages pbi.tools and the Power BI REST APIs. James details in the script the requirements to run and use the script; if you are familiar with PowerShell this could be the best option for you.
Fun fact: To my knowledge (and James’ credit) this is actually the first approach that was capable of doing this!
PART 3: RECOVER BOTH A MODEL AND REPORT
For most people, parts 1-2 should let you recover what you need. However, some may prefer that the model and report are in the same file. In this case, you simply combine Part 1 with one of the approaches in Part 2; adding the report and model metadata to the same, empty PBIP file. Then, you can continue with that file once you’ve handled the data (i.e. loaded it for an import model).
However, you will need to make one additional adjustment to the report definition file. Specifically, the datasetReference key/property. You must remove the part of the definition that says “byConnection” and instead add new information that says “byPath”. The latter refers to the local model in the same file, while the former refers to a live connection in the semantic model.
An example of this is below:

You’re now free to continue working with your new, thick boi report. Note that I haven’t tested this specific approach in some time; you might need to take additional, minor steps.

TO CONCLUDE
In certain circumstances, you might need to open a report or model in Power BI Desktop, but you can’t download it from the service. In these cases, the Download this file option is greyed out, and you might seem stuck. However, you can recover the report using semantic-link-labs using a Fabric notebook and lakehouse (with the OneLake Explorer) to retrive and use the report metadata. This approach is a pretty straightforward workaround, and it works even if the report is published to a workspace not on Fabric capacity.
To recover a model you can use Tabular Editor (to save the .bim or TMDL model metadata) or Git integration if the model is published to a Fabric, Premium, or PPU workspace. Alternatively, you can use the same approach as recovering the report, but retrieving the model metadata (.bim) instead of the report metadata.