

View & Edit Power Query in Tabular Editor
EDIT POWER QUERY WITHOUT THE .PBIX
…so you can manage your Power BI dataset entirely from Tabular Editor. No more Power BI Desktop!
SUMMARY
In this article, you will learn:
The Mash-up (M) Language sits behind Power Query data transformations, and provides you more power & flexibility in data transformations when adjusting or authoring your own M code.
It’s sometimes necessary to modify Power Query of a model without opening the .pbix.
In Tabular Editor 2 (TE2) & Tabular Editor 3 (TE3), you can view & edit the Power Query M formula language from the ‘partition’ or ‘shared expression’ objects of the TOM Explorer. You cannot edit M code while connected to a Power BI desktop file, though, unless unsupported features are enabled.
In the metadata file formats (.bim and database.json folder structure) it is also possible to manually view & edit Power Query M code, then deploy changes to the service.
You can automatically format Power Query M code using the Power Query Formatter by mogular GmBH (github link).
View & edit Power Query M code from Tabular Editor 2 or 3 in ‘Partitions’ in the TOM Explorer
BEFORE YOU START
In this article, it’s assumed:
You have installed either Tabular Editor 2 (TE2) or Tabular Editor 3 (TE3).
You are familiar with .bim or database.json (folder structure) metadata formats for tabular models.
If not, I recently wrote an article about it here.You have a Power BI Premium or Premium-Per User Capacity to be able to connect to and modify deployed datasets using XMLA endpoint connectivity (where read/write is enabled)
THE BASICS
Power Query & the Mash-up Language
One of the most powerful native tools at your disposal when working in Power BI is Power Query (PQ). Power Query is used to extract, transform and load (ETL) data into the tabular model created in Power BI Desktop. Power Query exists not only in Power BI, but also in other tools like Excel and other parts of the Power Platform, and has a Power Query online component in both Power BI Service (Dataflows) and Azure Data Factory. The name ‘Power Query’ refers to both the engine and the user interface provided in tools that use it, which allows for easy, effective data transformations.
Often ‘Power Query’ is used to refer to the underlying language, as well, although this is actually the Mash-up (M) formula language. All the transformations done in Power Query are translated to an M script, which you can see if you enable the formula bar in Power Query (under View) or when selecting the Advanced Editor, which will expose the entire M script for the query. The script can also be manually edited to produce a desired result you would otherwise not be able to do with the user interface.
Why adjust or author your own M code? Examples
Example 2: Rename columns by index
Below are two simple examples for when you would write your own Power Query M code to get a result not possible from the PQ user interface. In these examples, you rely on Table.ColumnNames() function to get a list of the column names, referring to the list instead of explicit column names, themselves. This can be helpful in certain use-cases to avoid errors when referring to column names of flat file (Excel, CSV) sources that might change, or if you prefer to handle column naming using indexes (i.e. like some may prefer in Python).
These can be extended to do a variety of other useful data transformations. They are just listed as examples to illustrate why exploring the M language for Power Query is so valuable.
Example 1:
Change all column data types
This is an example code snippet that changes all column types to text without referring to column names. This may be helpful if working with an Excel or CSV file with multiple users that make regular changes. If only using the UI, the ‘Changed Type’ step will refer to the column names. If the names are changed, the query breaks.
Version 1.1: Change types with the UI
This version is not optimal because the header for “Column 1” changes often, breaking the query.
#"Convert named columns to text" =
// Change column datatypes
Table.TransformColumnTypes(
#"Previous Step",
{
{"Column 1", type text},
{"Column 2", type text}
}
)
Version 1.2: Add MissingField.Ignore argument
This version makes it so that if “Column 1” is not found, the query can still complete.
It is still sub-optimal, because the changed column won’t have the right datatype. Worse, we won’t know, since an error message wasn’t thrown.
#"Convert named columns to text" =
// Change column datatypes
Table.TransformColumnTypes(
#"Previous Step",
{
{"Column 1", type text},
{"Column 2", type text}
},
// Do not throw an error if Column 1 or Column 2 are not found; skip them and continue the script
MissingField.Ignore)
Version 1.3: Changes all column types
This version will help because the columns will always have the right type conversion, even if the headers change or if new columns are added; but, those new columns will also be ‘text’ datatype.
#"Convert all columns to text" =
// Change column datatypes
Table.TransformColumnTypes(
#"Previous Step",
// Apply ', type number' to each list item
List.Transform(
// Get a list of all column names
Table.ColumnNames( #"Previous Step" ),
each {_, type text}
)
)
Example 2:
Renaming columns by index
Similar to example 1, this code snippet avoids explicitly naming the columns in an early step; they are re-named instead by their position (index) in the source table. This has its own disadvantages, of course, as it’s susceptible to errors if the column orders change in the source data. Depending on your use-case, you might prefer column names, or indexes.
Version 2.1: Change names with the UI
This version refers to columns by their names rather than indexes.
#"Rename columns by name" =
// Change column names
Table.RenameColumns(
#"Previous Step",
{
{"Column 1", "% Minerals Mined"},
{"Column 2", "# Rock & Stones"}
}
)
Version 1.2: Ad MissingField.Ignore argument
Similar to the left example, we can avoid an error thrown when a column is not found. Columns not specified won’t be renamed, but the query will continue. Since no error message is thrown, we won’t know that this happened.
#"Rename columns by name" =
// Change column names
Table.RenameColumns(
#"Previous Step",
{
{"Column 1", "% Minerals Mined"},
{"Column 2", "# Rock & Stones"}
}
// Do not throw an error if Column 1 or Column 2 are not found; skip them and continue the script
MissingField.Ignore)
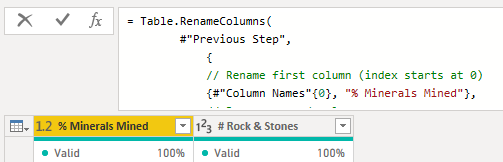
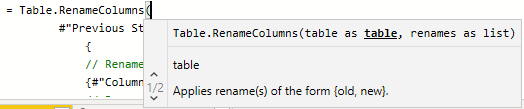
Version 1.3: Rename by column index
This version refers to columns by their index in the Table.ColumnNames() list created as a separate “variable” step.
// List of all column names
#"Column Names" =
Table.ColumnNames( #"Previous Step" ),
#"Rename columns by name" =
// Change column names
Table.RenameColumns(
#"Previous Step",
{
// Rename first column (index starts at 0)
{#"Column Names"{0}, "% Minerals Mined"},
// Rename second column
{#"Column Names"{1}, "# Rock & Stones"}
}
)
Tip
Adding comments with // before the #”Step” in Power Query will produce a description that you can also see in the “Applied Steps” UI. This can also be done in the UI itself by manually adding a description to that step.
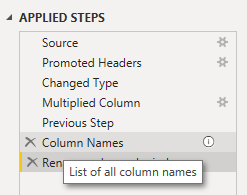
Descriptions in PQ are comments above the step in M
Learning the M language is worthwhile for Power Query
Experiment with the formula bar & intellisense to start to learn the M language
As mentioned already, there are many use-cases for adjusting the M code in the advanced editor, or writing your own M script, yourself. In general, this affords more flexibility and sometimes even better performance of a given query. It’s recommended that you try experimenting with the M script in the formula bar for a given step, so you learn. There, intellisense code-assist is enabled, to help you know what functions to select and which parameters they need. If you haven’t yet done so, it’s worthwhile familiarizing yourself with the basic M functions and examples of their use.
VIEW & EDIT POWER QUERY M CODE OUTSIDE OF POWER BI
Use-cases
Once you’ve developed your Power BI model, it is typically deployed to the Power BI service for testing and consumption by end-users. it is possible to connect to these data sources using XMLA endpoint, which enables both read and (on Premium & Premium-Per User capacities) write operations. This is very powerful for external tools like DAX Studio (read), SQL Server Management Studio (SSMS; read/write), ALM Toolkit (read/write) and Tabular Editor (read/write), among others. It’s commonly understood that you can develop DAX code using such tools, but what about Power Query?
There are many reasons why you may want to do this, such as…
-
It might be that you need to make a change in Power Query, but do not have access to the .pbix. Perhaps the latest .pbix is outdated, or even corrupted.
-
I have seen cases when Power BI files become so large and the relationships have such a high cardinality that opening the .pbix freezes the laptop every time. Such ‘monster models’ consume all available resources and make basic checks & developments a difficult, if not impossible.
If you aren’t fortunate enough to benefit from a virtual machine or better hardware, you might need to connect to either the extracted metadata or deployed dataset.
-
I regularly hear people assume that external tools only allow you to develop & modify DAX code. While this is certainly the most prevalent use-case - particularly with the numerous code assist features - it is still easy to modify Power Query from Tabular Editor, or deploy Power Query changes with ALM Toolkit.
If you are switching to using Tabular Editor & metadata files as the keystone for your development workflow, this is important to know. You can use Tabular Editor to develop entire models from scratch, end-to-end, without ever opening Power BI Desktop.

Inherited ‘monster models’ can sometimes be problematic to audit & explore in Power BI Desktop
Power Query in Metadata files
For example, a common (and recommended) workflow for Tabular Editor is working from the metadata files, either the .bim file or the database.json folder structure. These are first created by connecting to the model and saving it from Tabular Editor, or by using pbi-tools on the .pbix. This is to facilitate more granular source control of your Power BI model, which I have explained in a previous set of articles, here. When working from the metadata files, though, what do you do if you need to make a change in Power Query? What if you want to implement or change incremental refresh without Power BI Desktop? In fact, the M code is actually easily visible and editable in these metadata files. It is stored chiefly in two places:
Partitions: This is where the M code is for objects that are loaded into the model.
(Shared) Expressions: This is the M code for objects not loaded into the model, like parameters (i.e. RangeEnd, RangeStart for incremental refresh) or tables which have ‘load to model’ disabled.
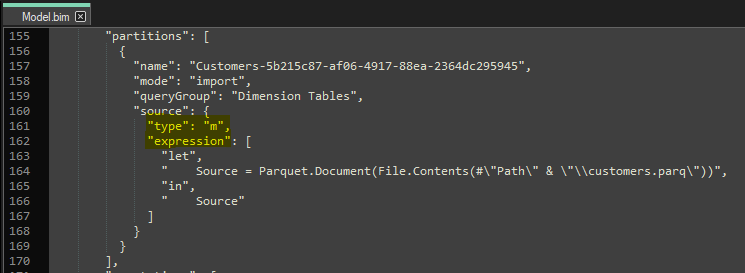
The M code visible in the .bim file…

…as well as in the serialized folder structure
In the above metadata files, it is technically possible to directly change the Power Query M code in the array for “expression”. Once these changes are saved, the metadata can be opened & deployed to the service using other tools like Tabular Editor or ALM Toolkit.
Modifying the metadata files is obviously not a pragmatic or recommended way to do this, though. Instead, you can much more easily do this from the user interface of Tabular Editor.
Using Tabular Editor & the TOM Object Explorer
In both TE3 and TE3, the M code is easily visible either when looking under “Shared Expressions” or the respective “Table name > Partitions”. From here you can edit the code and then save the changes to the metadata files or even the Power BI service. Note that you cannot save changes to the M expression when connected with an open Power BI Desktop model (.pbix), unless unsupported operations are enabled, but this is not recommended, as it can cause issues with your file.

View in Tabular Editor (TE) 2

TE2
View in TE3 is almost identical, save for extra formatting & UI customization

TE3
If you have incremental refresh enabled, you will notice multiple partitions, where the M expression is not fully visible in the expression editor. Instead, you will see in the Properties window the menu Refresh Policy. This contains information about how your data should be refreshed. There, under Source Expression, you also find the M code. You can even set up incremental refresh from scratch in Tabular Editor 2 and 3 using this menu. However be aware that unlike Power BI Desktop, Tabular Editor cannot inform you whether your query is folding to the source database or not, so it’s important to be aware of when query folding does and does not happen for the source you are using.
What if you want to add new columns, or new queries altogether? When adding new columns, you change the schema of your table. Tabular Editor 3 has a feature called ‘Update Table Schema’ which is meant just for this:

Updating the schema automatically or manually in TE3
Once you’ve saved your changes, right-click the table
Select ‘Update Table Schema…’
The query will be executed to retrieve the metadata
A summary of the schema changes will be shown, if any are detected
Sometimes, TE3 is unable to retrieve the metadata from the service, and will return an error. In this case, it is possible to modify the schema manually by creating or modifying the existing data columns in the table from the TOM Explorer.
When creating new queries, the easiest way is to copy existing queries, then modify the expression and update the schema. It is also possible to add tables using the Table Import Wizard & Data Sources, but this is a concept that I will discuss in later tutorials for Tabular Editor.
Exporting M Code from Tabular Editor

C# Script to export the M code (expression) from a table partition
It is also possible to export the M code from Tabular Editor and other tools using the Tabular Object Model library (TOM). Using C# scripts, you can refer to the objects and even write them to a file output. This can be context-sensitive, so you can write C# scripts for macros in TE3 or custom actions in TE2 to export expressions and properties for what you select.

Note that the result will include carriage returns (\r) and new line (\n) characters, as well as others (\nin) that you should replace / format out, for the script to be readable.
An example from other tools: DAX Studio
View & Export Power Query M code with DMVs
DAX Studio
Another way to read (not write) and extract the M expressions from your model is using DAX Studio. Be it for documentation or governance purposes, you might wish to extract expressions from your model. This is possible with both DAX and M code, as well as other model metadata. Just like DAX, Power Query M code is also visible in both the model Dynamic Management Views (DMVs) as well as the Tabular Object Model (TOM) for XMLA endpoint.
It is possible to extract all Power Query expressions from the model in DAX studio, for example using the DMVs. You are rather limited in how you can filter and explore this data, so typically people extract it to flat files and explore / document it in other tools.
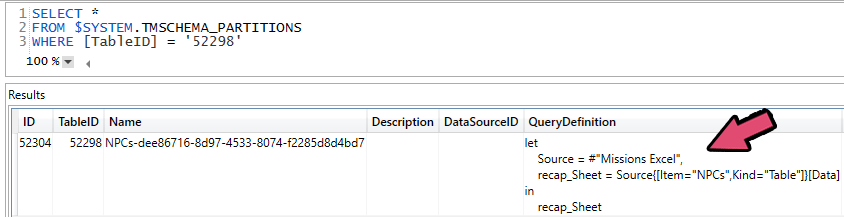
Using a pseudo-SQL syntax to query the model DMV for a specific partition, to see the M code
Formatting your Power Query M Code
Tabular Editor
A common best practice for authoring code is formatting it following consistent conventions. For DAX, this is trivial thanks to the efforts of the sqlbi team to create daxformatter.com which is integrated in tools like DAX Studio & Tabular Editor, which can automate this for you. Unfortunately, however, there are no formatting or code-assist features for authoring Power Query M code in Tabular Editor, like for DAX. However, this may be on the future roadmap.

Power Query Formatter
Until then, there does appear to be a less well-known formatter specifically for M code. Adopting a familiar name, powerqueryformatter.com works similarly to DAX formatter; you input the code and it will beautify the script, for you. You can then copy & paste this back into your application, like Tabular Editor, to save the changes to the metadata files or model. There is also an API available, but this is not yet integrated in any external tools; however, I’d guess it’s only a short matter-of-time before this happens. The Power Query formatter is created by mogular GmBH (github link).
Note
As with all external tools, it’s important to be conscious of what you are submitting to an external tool or service. Thus, it’s advised that you remove any non-parameterized connection strings or hard-coded, sensitive code elements (which is a bad practice, anyway) before using a code formatter like this.Use any third-party service or external tool at your own risk, after assessing it yourself.
You’ve now learned:
The Mash-up language (M code) sits behind Power Query
Modifying / authoring M code can be helpful for getting & transforming data effectively
You can read & modify Power Query M code outside of Power BI Desktop
External tools like Tabular Editor and DAX studio make this easier
You can beautify your M scripts using powerqueryformatter.com

Tools & knowledge to help you be more productive

