


Track Changes in Power BI: Part 2 - Tutorial

STEP-BY-STEP GUIDE TO SETTING UP VERSION CONTROL
…using Tabular Editor to manage your Power BI Dataset with more efficiency & power
Track changes in individual objects of your Power BI model, like measures, tables & more
CONTENTS
Part 1: Source Control in Power BI using Tabular Editor & DevOps
Part 2: Getting it done
Part 3: Next Steps
In the previous post, we learned:
What is Source Control and why is it important
What is the Tabular Editor (TE) Folder Structure / .bim save formats, and how to use them
How the TE Folder Structure save format enables better Power BI source control
Next up: Walk step-by-step through a tutorial to set up your own Power BI source control, using Tabular Editor 3, Visual Studio and an Azure DevOps repository.
Set-up: Creating your first Repository with Azure DevOps & Git

Source Control Management (SCM) using repositories is a valuable asset to defend yourself from governance risks.
If you’re unfamiliar with these concepts or don’t have an existing Repo to continue this tutorial, I list some helpful resources for you, below:
-
I’ve written a short how-to post explaining to the uninitiated (like pre-pandemic me) how to create an Azure DevOps Repo for Source Control.
You can find that article linked here, with a simple walkthrough on setting up your Repo to continue with your TE + PBI Source Control adventure.
-
For the uninitiated (like pre-pandemic me, hi again) you can find a few resources that might help with the rest of this article, below:
Introduction document from Visual Studio Code and Visual Studio (and here)
Source Control in Power BI (video from Guy in a Cube)
Implementing Proper Version Control (video from Havens Consulting)
Tutorial: Power BI source control with Tabular Editor & Azure DevOps
The steps henceforth assume that you:
Have access to a remote Azure DevOps repository
Have cloned the remote repository to a local directory with Visual Studio or another Git GUI
Have installed Tabular Editor 2 (TE2) or 3 (TE3)
1. Create a folder in your Repo directory with the name of your dataset
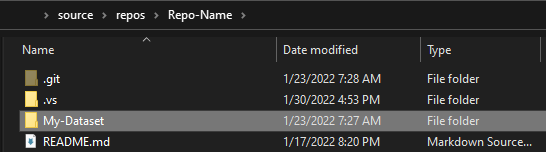
In the git repo “Repo-Name” cloned to our local machine, we created a folder “My-Dataset” where we will place the TE folder structure
If you’re managing multiple datasets and plan to include them all in one repo, this step is important to separate the folder structure. It’s recommended you have a separate Repo per dataset for cleaner & easier management of your source control.
If you plan on doing source control on .pbix report files, you should also have those in a separate Repo from your Power BI dataset source control.
2. Connect to the latest version of your dataset from Tabular Editor and “Save to Folder…” in the directory you just created

Connect to your latest model; either via XMLA or the .pbix, it doesn’t matter

Once you load the dataset, Save to Folder in the directory you just created (in the local Repo). Then close Tabular Editor.

The files will be visible afterward
You can do this with any format that you can connect to from your version of TE:
Power BI dataset on a Premium or Premium-Per-User capacity
Open .pbix file
.bim file
existing folder structure
Azure AS or SSAS-hosted Tabular Models
Once you have connected to the dataset, select from the ‘File’ menu the option ‘Save to Folder…’ and save it in the directory you just created, in the cloned Repo. Close Tabular Editor once this is done.
3. Open the repo in Visual Studio to check that all the objects have appeared
Once you have created the files in the appropriate directory, you can see them appear inside the ‘Git Changes’ tab of Visual Studio. This immediately shows any changed, added or deleted files in a hierarchical structure. Since each file at the bottom of the folder structure is a .json file describing an object in our model, this will thus show us all of our model objects.

Easily see everything that has changed, added or been deleted vs. the remote repo
4. Commit & push the initial model TE Folder Structure to your repo
If you’re new to working with Git & repos, you might be a bit confused at this step. If you look at your remote repository in DevOps, you won’t yet see your files. Why didn’t it sync? This is intentional, and because When working with a SCM system, changes need to go through formal phases before they can be synchronized to the remote repository. Depending on the process in your team or organization, different things might need to happen before changes can migrate up a level to enter the remote repository. For example:
Your changes are staged, to segment them into logical chunks (i.e. a bugfix or a specific new feature)
You commit the staged changes with an informative message
If you are working collaboratively using branching (which I will describe in Part 3), you may need to create a Pull Request. Another colleague may need to review the code for mistakes or to assure certain conventions are being followed, then approve your request (the pull request, or PR). This becomes particularly important when working collaboratively on code with dependencies, to ensure there are no regressions and everything can merge cleanly together
You push your changes to the remote repository, which initiates other steps (Build & Test)
Stage, add a commit message & push the files (like you normally would, if you are already using SCM). The commit message should be descriptive of the changes made (i.e. added sample model for demo)
5. Make a change to any object (i.e. format a measure) and save the folder structure to the same directory. Only the changed object will identify - check the object in Visual Studio to see the diff!
Any change made to the files in the folder structure will show up in the Visual Studio UI. Differences between the objects - anything from the expression to the extended object properties - will be visible when diffing changes in your local repo (or remotely, if you are working collaboratively) and the other version.
Diff a single object like a measure or table
6. As you usually would, add a commit message and push the changes to the remote Repo, when ready
You now can have batches of model changes staged, committed & pushed to a remote repository, creating a history for each object with the changes and messages for why something has changed.

A simple graph view of the changes
You’ve now implemented SCM for your Power BI model! Henceforth, you should be using Tabular Editor to connect to the folder for your changes. When you save the changes, they will be visible in the GIT UI.
Overview: The Final Workflow
This would be your new process for model development:
A structured workflow makes for happy goblins
Open Tabular Editor
Connect to the Folder in your local repo
Make & save changes in Tabular Editor
* Deploy changes to your QA workspace
* Refresh the model in the QA workspace
Test changes in the QA data model:
Using data exploration & querying methods from Tabular Editor 3
and/or using DAX queries from DAX Studio
and/or using business reports linked to the QA dataset
and/or clicky-clicky-draggy-droppy ad hoc from Power BI Desktop or Analyze-in-Excel
With a custom, automated Build/Test solution using APIs
** Stage and commit changes from Visual Studio or another GIT tool (UI or programmatically)
** When approved (usually after a tester validates in #6), push changes to your remote GIT repo
** Push QA dataset changes to Production workspace, using your standard application lifecycle management (ALM) process:
ALM Toolkit
Deployment Pipelines
Programmatically with APIs
** Update Production app(s) where necessary
Notes:
* This can be streamlined using Tabular Editor 3’s new Workspace Mode - see the next post for details
** This can be automated with Azure DevOps integration or custom programmatic solutions, even when i.e. splitting datasets and reports across multiple deployment pipelines
** Integrate with your own SCM & CI/CD process with i.e. build, test & deployment integration/automation;
— this is just an example
We’ve now learned:
How to create an Azure DevOps Repo for Power BI source control
How to see differences in model objects using a Git client like Visual Studio
How to save the TE folder structure to the Local Repo, and commit/push changes to the Remote Repo
How to use the TE folder structure for development in your new workflow
Next up: Find out how to make your workflow & collaboration more productive with TE3’s Workspace Mode, and by incorporating a Branching Strategy in your SCM.


