

Smart Buttons & Power BI Reporting

SIMPLE USE-CASES FOR SMART BUTTONS
…to create data or control Power BI by initiating Power Automate flows
FRESH DATA AT THE PUSH OF A (LITERAL) BUTTON
From lightbulbs to soccer balls, these days, it seems like everything is a “smart” device. Smart devices use sensors and software to connect to networks and send or receive information. This Internet of Things (IoT) has opened a world of possibilities, from automation to creating experiences bridging digital and physical worlds. If used in the right way, IoT devices can help us be more productive and make better decisions. For example, a company delivering medical products may use sensors on trucks to track their position and temperature, reporting in real-time from a controller dashboard, driving alerts and actions if values cross a certain threshold.
IoT solutions need not be so sophisticated to be valuable. Smart Buttons are examples of simple devices which can trigger downstream actions in other devices or digital products. For example, starting a playlist or switching off all lights in the house from your bedside. They can also be used to trigger automation flows, such as those created with Microsoft Power Automate. This opens a whole world of possibilities to create simple, low-code IoT solutions in minutes. By linking one or more flows to a button, we can automate downstream actions like:
Create or update a record in a database
Refresh a Power BI dataset
Query a Power BI dataset and get the result as a Teams or SMS message
Export a Power BI report or paginated report and get the pdf or pptx in email or Teams
Example of a Flic button refreshing a Power BI dataset (and my cats yelling)
In this article, we look at how to set this up for yourself using Flic smart buttons and the Power Platform. To illustrate, I will explain with a simple, real-world use-case encountered by my wife & I with our first child, where we needed a quick and simple way to meticulously log & track data after her birth. While the examples discussed in this article are short and trivial, they show how physical smart buttons can be used to address real-world problems with solutions made in Power BI & Power Automate.

USING SMART BUTTONS WITH POWER BI
I. SET-UP: FLIC & POWER AUTOMATE
II. EVENT-TRACKING EXAMPLE: ‘THE POOP BUTTON’
III. TIME-TRACKING EXAMPLE: ‘THE BREASTFEEDING BUTTON’
I. SET-UP: FLIC & POWER AUTOMATE
SETTING UP YOUR FLIC SMART BUTTONS

Flic Hub LR & Flic Buttons. The black thing is a Flic IR accessory, which you don’t need for this tutorial.
What you need:
A Flic 2 or Flic Twist button
The Flic iOS or Android App to configure & manage the buttons
(Optional) A Flic Hub LR if you don’t want the buttons to be dependent on your smartphone
(Optional) Stickers to label your buttons
There are many smart buttons available, though I have only used the Flic buttons by Shortcut Labs. Simple, elegant and widely integrated, Flic buttons only require you to plug in the Flic Hub LR and install the Flic smartphone app for iOS and Android. It’s also possible to use your phone, alone, instead of a hub. The user interface will guide you through linking new Flic buttons; simply register with Flic, give your buttons an identifiable name and then you can link them to a specific action. It’s super easy. If you’re using the Hub, the app will also allow you to connect it to your WiFi network.
LINKING FLIC TO POWER AUTOMATE
From the Flic App, your can set actions for a click, double-click or hold. You can set multiple actions for each “type” of click. For example, you can configure a single click to dim your Philips Hue lights and then start a playlist. All we have to do here is select ‘Microsoft Flow’ for all the buttons we want to use to trigger downstream, automated actions.
This is all we need to configure for our buttons, for now! Later, we can place them to a fixed location or add a label/sticker, but the rest of the work is done in Power Automate.
CONFIGURING A FLIC TO TRIGGER A POWER AUTOMATE FLOW
Once we’ve set the appropriate button actions in the Flic app, we need to create the Power Automate flow. Navigate to Power Automate and select My Flows > New Flow > Automated Cloud Flow. These flows will be executed whenever the trigger is detected; in this case, pushing the Flic button.

Create a new Automated cloud flow in Power Automate which will be triggered by our Flic button
When creating the flow, we can select from a number of different triggers. Flic has a default connector in Power Automate, making it trivial to set up new flows connected to Flic buttons in our account that can be triggered up to 100 times / minute. Searching ‘Flic’ in Power Automate reveals two different triggers:
When a Flic is pressed
This lets us link a Flic press (single-click, double-click or hold) to a specific flow.
You can also link all buttons or an entire hub to a flow, and any press type from any button.When a Task is executed
This lets us link a Task executed by a Flic button to a specific flow.
To be honest, I haven’t successfully gotten this to work.
We should select the first one - When a Flic is pressed - to link to our button:

Select the trigger ‘When a Flic is pressed’
CONFIGURING THE POWER AUTOMATE FLOW
Once you’ve selected the trigger, you can authenticate to your Flic account and select the button & press that should trigger the flow. In the below example, any time the button called RefreshDatasets is pushed with a single-click, it will initiate this Flow. For this to work, you need either your Flic Hub LR to be plugged in, or if you are using your phone, your phone to be on and connected to the internet. Note that re-naming or removing buttons from the Flic app will break this trigger step.
From here, it’s the same as configuring any Power Automate flow. The simplest example is refreshing a single dataset when a button is pushed; a two-step flow that literally takes seconds to set up. Now you can give that button to your manager and they can refresh the Power BI dataset whenever they want! 😉
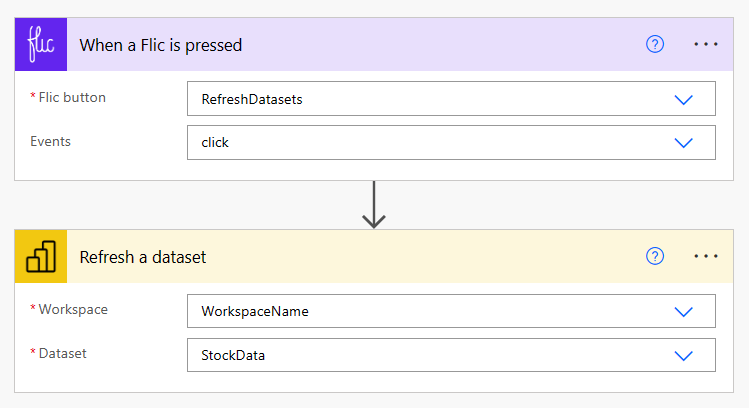
Example of a simple Flow that refreshes a Power BI dataset when you push a button.
A WIDE WORLD OF POSSIBILITIES
The above example is trivial and fun, but there are tremendous possibilities, here. Any action you can trigger with Power Automate can now be linked to a physical button-press. You can even inter-connect flows created with Power Automate Desktop or multiple, cascading cloud flows. Honestly, this is so easy that literally the hardest part is defining the use-case. The only lament is that you cannot provide user input with the button push. For example, you cannot hold the button and speak a command that can be incorporated in the trigger; if you want to specify which dataset to refresh, for example. Only the below attributes can be used:
Longitude/Latitude
Button ID
Click Type
Click Time
This does mean that you can technically map datasets to specific Longitude/Latitude combinations in your house or office, where the button will refresh different datasets depending on where you are when you push it. In the sales office? Refresh the sales report. Finance department? Margin report. HR? HR Headcount report. Again, trivial examples, but you can imagine real possibilities here.
For collecting additional information, you need to incorporate intermediate steps to ask the user for input via SMS, teams messages or email, for example. You may push the button to query a dataset and receive an SMS to ask which region to filter, for example.
REAL-WORLD EXAMPLES
    The below example originated from a recent, real-world need my wife & I had.
    It is rather personal and has to do with infant input/output (ahem… 🍼💩)
    You’ve been warned!
EXAMPLE: SMART BUTTONS & POWER PLATFORM
On January 25th, my first child was born. To ensure her health, the hospital asked us to track some metrics. For example, we had to write down when she required changing and when / how long she was being breastfed. This is pretty common and you probably know what I’m talking about if you have a child, yourself.
We got a booklet to do this that had an hourly table we were meant to fill in by hand. This is fine, but we quickly realized since newborns need to be fed and changed once every 3 hours or less, you get tired and make mistakes or forget to write this stuff down. Did we change her? When did we last breastfeed? It seems like she’s feeding / going to the bathroom less than before? Exacerbated, after the first sleepless night, my wife asked if there was a way we could automate this or make it easier.
Specifically, she wanted a reliable, easy way for us to:
Track our daughter’s diaper changes
Track how long she was breastfeeding
See her weight vs. the WHO weight-for-age average
Simple reporting about 1-3 so she could see if things were proceeding as normal
We picked up some of these Flic smart buttons, and in less than an hour set up some basic Power Automate flows to collect and report the data, on-demand. It saved us time and was a fun little data project to turn something stressful (measuring your child’s I/O) into an informative and helpful project.
We even used some of the data to make a digital birth card in a Power BI report:
II. EVENT-TRACKING: 'THE POOP BUTTON'
ADDING DATETIME STAMP RECORDS WITH A SMART BUTTON
My wife & I needed to track the frequency of our daughter’s diaper changes at the request of the hospital pediatrician. If it’s more or less frequent than normal, then we should raise it as an issue. This also led us to thinking it would be funny to track a running total of the number of diapers changed over time for all our kids. Doing this manually would require laborious data entry and we would inevitably give up, especially since the first weeks see diaper changes every 2-3 hours. Setting this up with a smart button, however, is trivial.
Tracking events with a smart button is as simple as creating a new record when the button is pushed. This can be as simple as a record in an Excel file, adding a row to a Power BI dataset or to a SQL Database. When the button is pushed, the DateTime stamp can be entered with other custom data to log the event. Thereafter, other downstream actions can handle & use the data for informed processes. Note that you may need to add or subtract hours from the button press time depending on where your tenant is located. Below is an example for CET where the button push Date & Time are logged in UTC:
    DATE POWER AUTOMATE EXPRESSION
    Add 1 hour and format date as YYYY-MM-DD, i.e. '2023-02-01'

    addHours(triggerOutputs()?['body/clicked_at'], 1, 'yyyy-MM-dd')
    TIME POWER AUTOMATE EXPRESSION
    Add 1 hour and format date as HH:MM, i.e. '23:11'

    addHours(triggerOutputs()?['body/clicked_at'], 1, 'HH:mm')
SOLUTION OVERVIEW
In the below example, we created what we affectionately refer to as the “Poop Button”, which:
Logs diaper changes
Tracks whether the diaper was a #1, #2 or both
Loads this data into a Power BI dataset for analysis
Uses the data to decide whether to order more diapers with a Power Automate Desktop UI Flow (triggered via the Power Automate Cloud flow; you need Premium for this). The diaper data is initialized and then kept up-to-date with each order.
A version of the solution design, visualized in mermaid.js. All flows work together to log information and take the appropriate action in a data-driven manner.
The result was a simple and fun way for us to track diaper use and even link it to diaper purchases using a UI Automation flow with Power Automate Desktop.

A mobile notification notifies us of the remaining diapers.
When they get below a threshold, more diapers are ordered, automatically.
III. TIME TRACKING: 'THE BREASTFEEDING BUTTON'
Breastfeeding is a challenging, stressful thing for new parents. There is a lot of (frankly unnecessary) pressure to do it, and do it ‘right’, but it is difficult to get it to work with your child. There are a lot of things to pay attention to, and it takes a lot of time and energy from Mom. According to the hospital doctors, we needed to note when our daughter was feeding and how long for each breast. We even needed to know which breast the child last fed from, to start with that one next time. Just doing breastfeeding is already asking a lot, so writing all this stuff down seemed ridiculous and impossible. My wife came up with the idea of using the smart buttons for this, too, to log the start & stop time for each breast and notify her how long it took via a text message.
Performing start/stop time tracking with smart buttons is essentially the same as event logging. The only difference is finding a way to link the “stop” event to the corresponding “start” event. There are different ways to do this, but the simplest is to get the last record in the “start” DateTime column. There are also more error- and data quality-handling steps to set up if the data is to remain of useful integrity.
    GET LAST START DATE POWER AUTOMATE EXPRESSION
    Get the last record from the 'StartTime' column, to use as a key & update 'StopTime'

    last(body('Get_Table_Rows')?['value'])?['StartTime']
SOLUTION OVERVIEW
In the below example, my wife asked for two buttons, one for each breast:
Logs the frequency & timing for when the baby is fed
Sends her an SMS to her phone (and smartwatch) to say how long the child was breastfeeding.
This also helps her remember which side was done last, and also whether the recent session was anomalous or not (very short or very long) as that might indicate a problem.
Note: To send SMS messages with ClickSend, you must pay per message for their service and have a Premium Power Automate license.
A version of the solution design, visualized in mermaid.js. These flows made it easier for my wife to track & follow-up on breastfeeding, and also to analyze the data herself both out of interest and to see if things were trending as expected.
The result was something that made it easy to log the data and track the timings, removing the need to manually use a timer, write things down or try to remember things without aid.
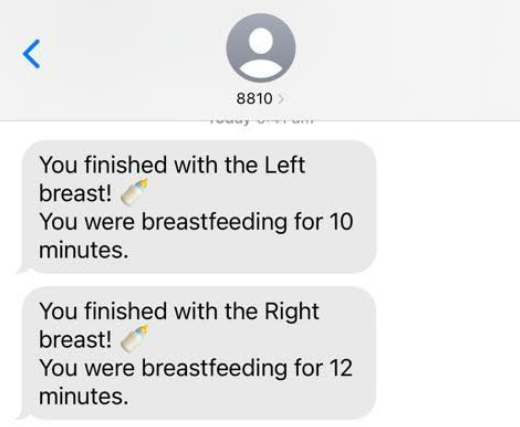
The result of the flow, a message to help my wife track & time the breastfeeding moments.
BEYOND BREASTFEEDING - OTHER USE-CASES
There are of course many other use-cases for this kind of logging. Any events can be logged, such as work periods / project timesheets, time on tasks, etc. If it cannot be fully automated using other tools, you can use smart buttons to streamline the process and eliminate manual data entry and the pains & time wasting that comes with it.

TO CONCLUDE
Smart buttons and switches can be used to create or modify data and trigger downstream actions, like refreshing, exporting or even querying Power BI datasets. If set up correctly, these devices help you be more efficient, saving time and convenience, and are honestly just fun to use. There are many use-cases both in a professional and personal setting worth investigating, particularly since it’s so simple to set up with Flic Smart Buttons & the Power Platform.

