

Running PowerShell from a Python GUI
Testing a graphical user interface (GUI) to run pbi-tools in Python
A basic GUI made in Python to run pbi-tools extract and decompile a .pbix
IN THIS ARTICLE
Running PowerShell from Python (i.e. running pbi-tools in Python)
Creating a GUI in Python using Tkinter
Executing a Python script from a shortcut
CONTEXT
I’ve been recently working on some use-cases to programmatically modify Power BI thin reports using pbi-tools and Python. A recent example use-case was setting all column widths in tables and matrixes to the same size. To decompile reports to their source code, until now, I’ve mainly been using pbi-tools from PowerShell, for example, by automating it whenever I save a .pbix file using a Power Automate flow.
I wondered whether I could make this more convenient for the python work by executing pbi-tools within the python script, to immediately handle the outputs and then re-compile the file after adjustment. Further, the scripts require a lot of manual input, so I’ve been experimenting with a python-created GUI to simplify its use. This not only made it more convenient for myself, but also was an interesting exercise in thinking about application design & user experience from the ground up, rather than in the fixed context of a Power BI report.
TUTORIAL
WHAT YOU NEED
Python 3.x installation / environment (not Colab unless you are using your local runtime)
pbi-tools installation & added to your path environment setting.
RUNNING POWERSHELL FROM PYTHON (I.E. PBI-TOOLS):
To be clear - I’m neither an expert in Python or in PowerShell. I’ve been learning both to help me with a number of projects - mainly hobby projects. My interest was whether I could execute a PowerShell command from within python, and continue to use the downstream result.
Doing this is rather easy; you need to only use the subprocess module to spawn new processes. If you execute subprocess.run() you pass a single string as an argument that contains:
The location of the PowerShell installation (powershell)
The .ps script or function you want to call (pbi-tools in my case)
Any arguments for (2) (extract pbixpath and -extractFolder outpath in my case)
powershell = r'C:\Windows\System32\WindowsPowerShell\v1.0\powershell.exe'
pbixpath = r'C:\Users\Klonk\Desktop\column-width_thin-report.pbix'
outpath = r'C:\Users\Klonk\Desktop\pbi-tools-output\'

subprocess.run(f'{powershell} pbi-tools extract {pbixpath} -extractFolder {outpath}')
Continuing with the downstream result is also straightforward using the argument capture_output=True. Saving the result to a variable also means you can check the returncode, to see if the process completed successfully, like in the below example:
pbitools = subprocess.run(f'{powershell} pbi-tools extract {pbixpath}')

if pbitools.returncode == 0:
    print('Success 😁')
else:
    print('Fail 😥')
That’s pretty much it - note that if you are using subprocess there are some security considerations with the shell arg. in the docs.
CREATING A GUI IN PYTHON - TKINTER:
Now we can execute pbi-tools from python in order to decompile a .pbix report. While this was already what I needed, it was inconvenient, since the path needed to be manually specified. The only way to make it more dynamic was to either search for .pbix files in a given directory - which I didn’t want to do - or create a basic graphical user interface (GUI) so I could select the .pbix file, myself.
I’ve never attempted to create GUI before, so this seemed like an interesting opportunity to give it a go. Creating a GUI wasn’t just something interesting for this specific use-case; it is also an interesting way to think differently about user experience (UX), by working from the ground-up instead of a fixed canvas.
There are a number of different ways to create a GUI in python; I opted for tkinter, since it’s well-known, the syntax seemed logical, and there were some good learning resources. tkinter works in a relatively simple way; you specify a number of widgets that work together to create the GUI. Creating these widgets involves defining some functions that can be called and referenced, where functions can modify other widgets conditionally. An example of this might be an ‘OK’ button which is disabled until the user takes an action, upon which time the ‘OK’ button widget is changed to the enabled state. Given these cross-references and dependencies, it’s easy to imagine that it can quite quickly get complicated (like with any UI design).
STEP 1. Initialize the window:
After importing the packages, the first step is to initialize and format the window; the root widget.
from tkinter import *
from tkinter import ttk
from tkinter import filedialog

class GUI:

    def __init__(self):

        # Initialize the root widget
        self.root = Tk()
        # Title of the window
        self.root.title("Python pbi-tools")
        # Window colour, size & cursor
        self.root.configure(bg='#f3f0ea', width = 600, height = 150, cursor="hand2")
        # Whether the window is x, y resizable (False)
        self.root.resizable(False, False)

        # Uses display; responds to input until termination
        self.root.mainloop()

GUI()
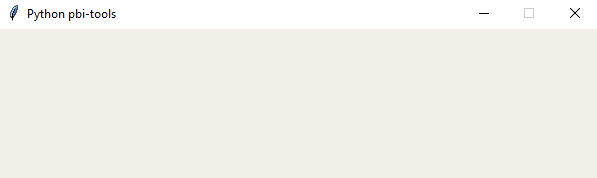
Result: A blank window appears on the screen, formatted as we specified
STEP 2. Add some text label widgets:
Next, we can add some simple text titles and labels.
With this UI, I just want the user (me) to select a .pbix, and an output path.
Note that the default behavior is not to have the text labels be transparent; we need to specify the background if we want it to match a custom background in our window.
from tkinter import *
from tkinter import ttk
from tkinter import filedialog

class GUI:

    def __init__(self):

        # Initialize the root widget
        self.root = Tk()
        # Title of the window
        self.root.title("Python pbi-tools")
        # Window colour, size & cursor
        self.root.configure(bg='#f3f0ea', width = 600, height = 150, cursor="hand2")
        # Whether the window is x, y resizable (False)
        self.root.resizable(False, False)

        # Title for main window
        self.message = Label(self.root,
                                text = "Select a .pbix file to decompile it with pbi-tools",
                                font = ("Segoe UI", 14, 'bold'),
                                fg = '#3d4244',
                                justify = CENTER,
                                bg='#f3f0ea')
        self.message.place(relheight = 0.15, relx = 0.14, rely = 0.07)

        # Label for the filepath row header
        self.LabelInputPath = Label(self.root,
                                        text = "Input .pbix: ",
                                        bg='#f3f0ea')
        self.LabelInputPath.place(relheight = 0.2, relx = 0.117, rely = 0.3)

        # Label for the filepath text
        self.LabelSelectedFilePath = Label(self.root,
                                            text = "Select a .pbix file to decompile.",
                                            bg='#f3f0ea')
        self.LabelSelectedFilePath.place(relheight = 0.2, relx = 0.23, rely = 0.3)

        # Label for the output path row header
        self.LabelOutputPath = Label(self.root,
                                            text = "Output Path: ",
                                            bg='#f3f0ea')
        self.LabelOutputPath.place(relheight = 0.2, relx = 0.1, rely = 0.51)

        # Label for the output path text
        self.LabelSelectedOutputPath = Label(self.root,
                                            text = "Select an output path.",
                                            bg='#f3f0ea')
        self.LabelSelectedOutputPath.place(relheight = 0.2, relx = 0.228, rely = 0.51)


        # Uses display; responds to input until termination
        self.root.mainloop()
GUI()
So far, so good. The syntax is straightforward and the result is what we expect.

Result: The window now has some instructions & a title
STEP 3. Add the buttons:
The button widgets come next. These are quite easy to add, but adding the functionality will take some extra work; we need to define some functions that the buttons will call in the ‘command’ argument, which isn’t included in these widgets this step, yet.
from tkinter import *
from tkinter import ttk
from tkinter import filedialog

class GUI:

    def __init__(self):

#####################
# STEP 1
#####################

        # Initialize the root widget
        self.root = Tk()
        # Title of the window
        self.root.title("Python pbi-tools")
        # Window colour, size & cursor
        self.root.configure(bg='#f3f0ea', width = 600, height = 150, cursor="hand2")
        # Whether the window is x, y resizable (False)
        self.root.resizable(False, False)

#####################
# STEP 2
#####################

        # Title for main window
        self.message = Label(self.root,
                                text = "Select a .pbix file to decompile it with pbi-tools",
                                font = ("Segoe UI", 14, 'bold'),
                                fg = '#3d4244',
                                justify = CENTER,
                                bg='#f3f0ea')
        self.message.place(relheight = 0.15, relx = 0.14, rely = 0.07)

        # Label for the filepath row header
        self.LabelInputPath = Label(self.root,
                                        text = "Input .pbix: ",
                                        bg='#f3f0ea')
        self.LabelInputPath.place(relheight = 0.2, relx = 0.117, rely = 0.3)

        # Label for the filepath text
        self.LabelSelectedFilePath = Label(self.root,
                                            text = "Select a .pbix file to decompile.",
                                            bg='#f3f0ea')
        self.LabelSelectedFilePath.place(relheight = 0.2, relx = 0.23, rely = 0.3)

        # Label for the output path row header
        self.LabelOutputPath = Label(self.root,
                                            text = "Output Path: ",
                                            bg='#f3f0ea')
        self.LabelOutputPath.place(relheight = 0.2, relx = 0.1, rely = 0.51)

        # Label for the output path text
        self.LabelSelectedOutputPath = Label(self.root,
                                            text = "Select an output path.",
                                            bg='#f3f0ea')
        self.LabelSelectedOutputPath.place(relheight = 0.2, relx = 0.228, rely = 0.51)

#####################
# STEP 3
#####################

        # Input File Browse button
        self.button_input_browse = ttk.Button(self.root,
                                                text = "Browse...")
        self.button_input_browse.place(relx = 0.53, rely = 0.315)

        # Output Path Browse button
        self.button_output_browse = ttk.Button(self.root,
                                                text = "Browse...")
        self.button_output_browse.place(relx = 0.53, rely = 0.52)

        # Cancel button
        self.browse_button = ttk.Button(self.root,
                                            text = "Cancel")
        self.browse_button.place(relx = 0.73, rely = 0.8)

        # Add OK button
        self.button_OK = ttk.Button(self.root,
                                        text = "OK")
        self.button_OK.place(relx = 0.865, rely = 0.8)

#####################
# Uses display; responds to input until termination
#####################

        self.root.mainloop()

GUI()
Result: Buttons, but they don’t do anything, yet.
STEP 4. Define functions for the button commands:
Here’s where the complexity ‘ramps up’. We should now tell tkinter what we want the buttons to do. The cleanest way to do this is to define some functions specifying the button commands. This is done by just modifying the above code to include for each button an additional argument, where command = function() [the functions we will define, below].
We have 4 buttons and we want them to each do a different thing:
Input .pbix Browse… button: Open a file dialog to select a .pbix file (and only .pbix files). This path will be used as a string variable when we call pbi-tools with subprocess.run(), later.
STEP 5. Modify existing widgets:
We should hide this button once it’s used, so it doesn’t get used again. To do that, we use .place_forget().
Further, we should modify the existing FilePath widget we added (which originally provided some instructions) to the selected path. This is just done by updating the .config()
#####################
# Input .pbix browse button
#####################

    def get_file_path(self):
        # Set global file_path var
        global file_path
        # Open file dialog accepting only .pbix files; path will be the file_path var
        file_path= filedialog.askopenfilename(title = "Select A File", filetypes = [("pbix files", "*.pbix")])

    #####################
    # Step 5: Modify existing widgets
    #####################

        # Hide button after push
        self.button_input_browse.place_forget()
        # Update text label with file path
        self.LabelSelectedFilePath.config(text=file_path, bg='#f3f0ea')
        # Update 'OK' button state once the file dialog is done
        self.button_OK["state"] = NORMAL
Output path Browse…button: Specify an output path. This output path will likewise be used as a string variable argument for pbi-tools. It should include a new suffix ‘/pbi-tools-output’ to ensure that no existing directory is affected by -extractFolder.
STEP 5. Modify existing widgets:
Like the Input button, we should hide this button once it’s used, so it doesn’t get used again. To do that, we use .place_forget().
#####################
# Output path browse button
#####################

    def get_output_path(self):
        # Set global file_path var
        global output_path
        # Open and return file path as file_path var
        output_path = filedialog.askdirectory(title = "Select An Output Destination") + f'/pbi-tools-output'

    #####################
    # Step 5: Modify existing widgets
    #####################

        # Hide button after push
        self.button_output_browse.place_forget()
        # Update text label with file path
        self.LabelSelectedOutputPath.config(text=output_path, bg='#f3f0ea')
Cancel Button: Quit the GUI and terminate the program without doing anything else.
#####################
# Cancel button
#####################

    def cancel(self):
        self.root.destroy()
        exit()
OK Button: Confirm the input .pbix selected and continue the script.
STEP 5. Modify existing widgets:
Here we need to conditionally modify the ‘OK’ button itself. We don’t want to be able to select ‘OK’ and continue until a file path to a .pbix is specified. To do that, we add to the first init function the below, which will set the default state of the ‘OK’ button:
self.button_OK["state"] = DISABLEDWe can then change this in the ‘Input’ button, changing the state after the file dialog is done:
self.button_OK["state"] = NORMAL
#####################
# OK button
#####################

    def close_window(self):
        # Ends the tkinter window and continues the script; doesn't exit()
        self.root.destroy()

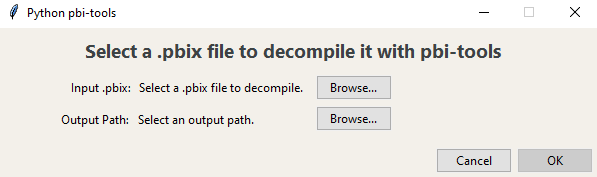
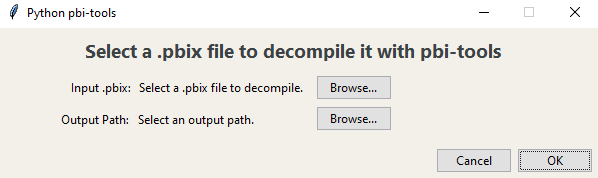
Result: Before selecting a .pbix and output path
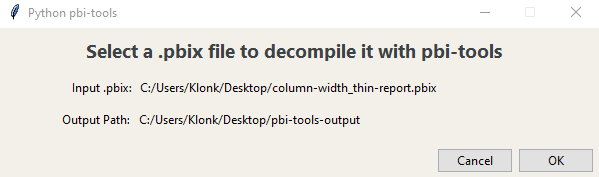
Result: After selecting a .pbix and output path
STEP 6. Use the global variables downstream in the rest of the script:
Combining with the subprocess.run code, above, we can add some formatting and error handling to get a nice output, where our tkinter GUI can successfully run pbi-tools and decompile the .pbix. Lastly, I also added some additional code to specify that the default window position to the center of the screen, and that it is always the top window.

The final output; all run from within Python.
I can now run pbi-tools from within python, and use the output for other, downstream programmatic actions.
TO CONCLUDE
It’s possible to run PowerShell from within python using subprocess.run() and specifying the powershell.exe path.
You can use the output from the PowerShell script or program downstream in python
Creating a GUI using tkinter in Python is surprisingly easy, but the co-dependencies should be managed.
There are a lot of conditions to test when creating a GUI that you take for granted when using low-code or no-code tools, like when designing a report in Power BI.


